Showing posts with label use your scraps. Show all posts

Wednesday, 17 December 2014

Layout Backgrounds

Hi all!  Candace here today sharing with you some ideas on how to create your own background for a layout.  If you have a bunch of scraps left over this is the perfect way to use them!  You can work with papers that are from one collection or mix and match.  That is the joy of creating your own background, you get to choose!
First off is a layout that I created from a bunch of different lines.  I used a Silhouette cut file as my base and cut various scraps to fill in the spaces.  It was quick and easy.  I didn't worry about cutting the papers perfect as the overlay covered up all the imperfections.  I felt that the paper piecing added a lot to the layout so I went light on embellishments to let the background be the focus.


On the next layout I used I used a 1inch square punch to create a pattern.  I cut a bunch of squares out of a 6x6 paper pad then cut each square in half, corner to corner.  I laid out all the squares on a 12x12 base that I had lightly watercolored.  To keep all the pieces secured to the page and to add a little more interest I sewed diagonally on the page.  I love the final result!  (Now I just need to find the perfect picture to scrapbook.)


Lastly is a layout that I shared earlier this month.  I re-share this layout because I want to show you how easy it is to create a background even if you can't think of any ideas.  The idea for this background came from a 12x12 paper in the collection.  Here is a picture of the original paper.  

To create the background all I did was cut out along the lines.  Then I placed all the colored pieces of paper on another paper from the collection and stitched right down the middle of each line with my sewing machine.  The idea was right there!  


I hope this gave you a few ideas on how to create your own background for you layout.  If you have any questions leave a comment below.  Thanks so much for stopping by!


Tuesday, 9 December 2014

How to Make a Card From Scraps


(In the spirit of the “use what you have” theme of this article, I’ll let you in on a little secret.  This is an updated version of an article that I wrote earlier this year.  It is so appropriate for not only this time of year, but any time you want to use up some of those scraps and “extras” that you have hanging around in your stash, that I wanted to share it with you this month.)

******************************************************************************

You know you have them.  I have them too.  We all have them.  They seem to mock us from our scrapbook drawers, bins, baskets, and paper holders.   I’m talking, of course, about paper scraps.  Yes, those leftovers from scrapbook pages, cards, and other paper projects that we just can’t bear to throw away.  We have to keep them because we paid good money for that paper, or because we don’t like to waste things, or because of a dozen other reasons.  In any case, let’s just put those little bits of loveliness to use, shall we?


Here is what you will need to make a card from scraps:

·         Cardstock cut to desired size  (I used a piece that is 4 ¼ x 5 ½ inches when folded in half.)
·         Sheet of printer paper or other scrap paper cut to the same dimensions as your card base  (In my case, it was 4 ¼ x 5 ½ inches.)  We will trim this to a smaller size later.
·         Scraps of paper or cardstock that can be cut into strips
·         Adhesive (Dry works best.)
·         Paper trimmer
·         Sharp scissors
·         Stamped image or other focal image
·         Greeting (optional)
·         Assorted embellishments

1.      Trim your scraps into strips of varying lengths.  You will want some wider than others to    create interest.  You will want them a little bit longer than your scrap of printer paper.
2.      Generously apply adhesive to your computer paper.
3.      Beginning at the top, place your strips of paper on top of the adhesive, butting them up against each other to make sure that they are straight.  The strips should overhang on each of the side edges of the paper.
4.      With scissors, trim the strips flush with the paper base.
5.      Using your paper trimmer, trim the background piece that you have created to ¼” smaller than your folded card base.
6.      Adhere the background piece to the card base.
7.      Add your focal image, greeting, and embellishments.

This is a great project to use up all those extra “things” that you have in your stash.  You can also mix in some of your new supplies to jazz things up a little.  Use some of those flair and wood veneer shapes you’ve collected; add a few enamel dots from the piles that you have stuck in a drawer; glue on a couple of sequins that you bought on sale at the craft store.
I hope this has inspired you to grab some of those leftover scraps and supplies and make a card for someone who is special to you.  


******************************************************************************

Happy Holidays, everyone!

 
   Jeanette Giancaspro


Wednesday, 15 October 2014

Let's Make A Pinwheel!


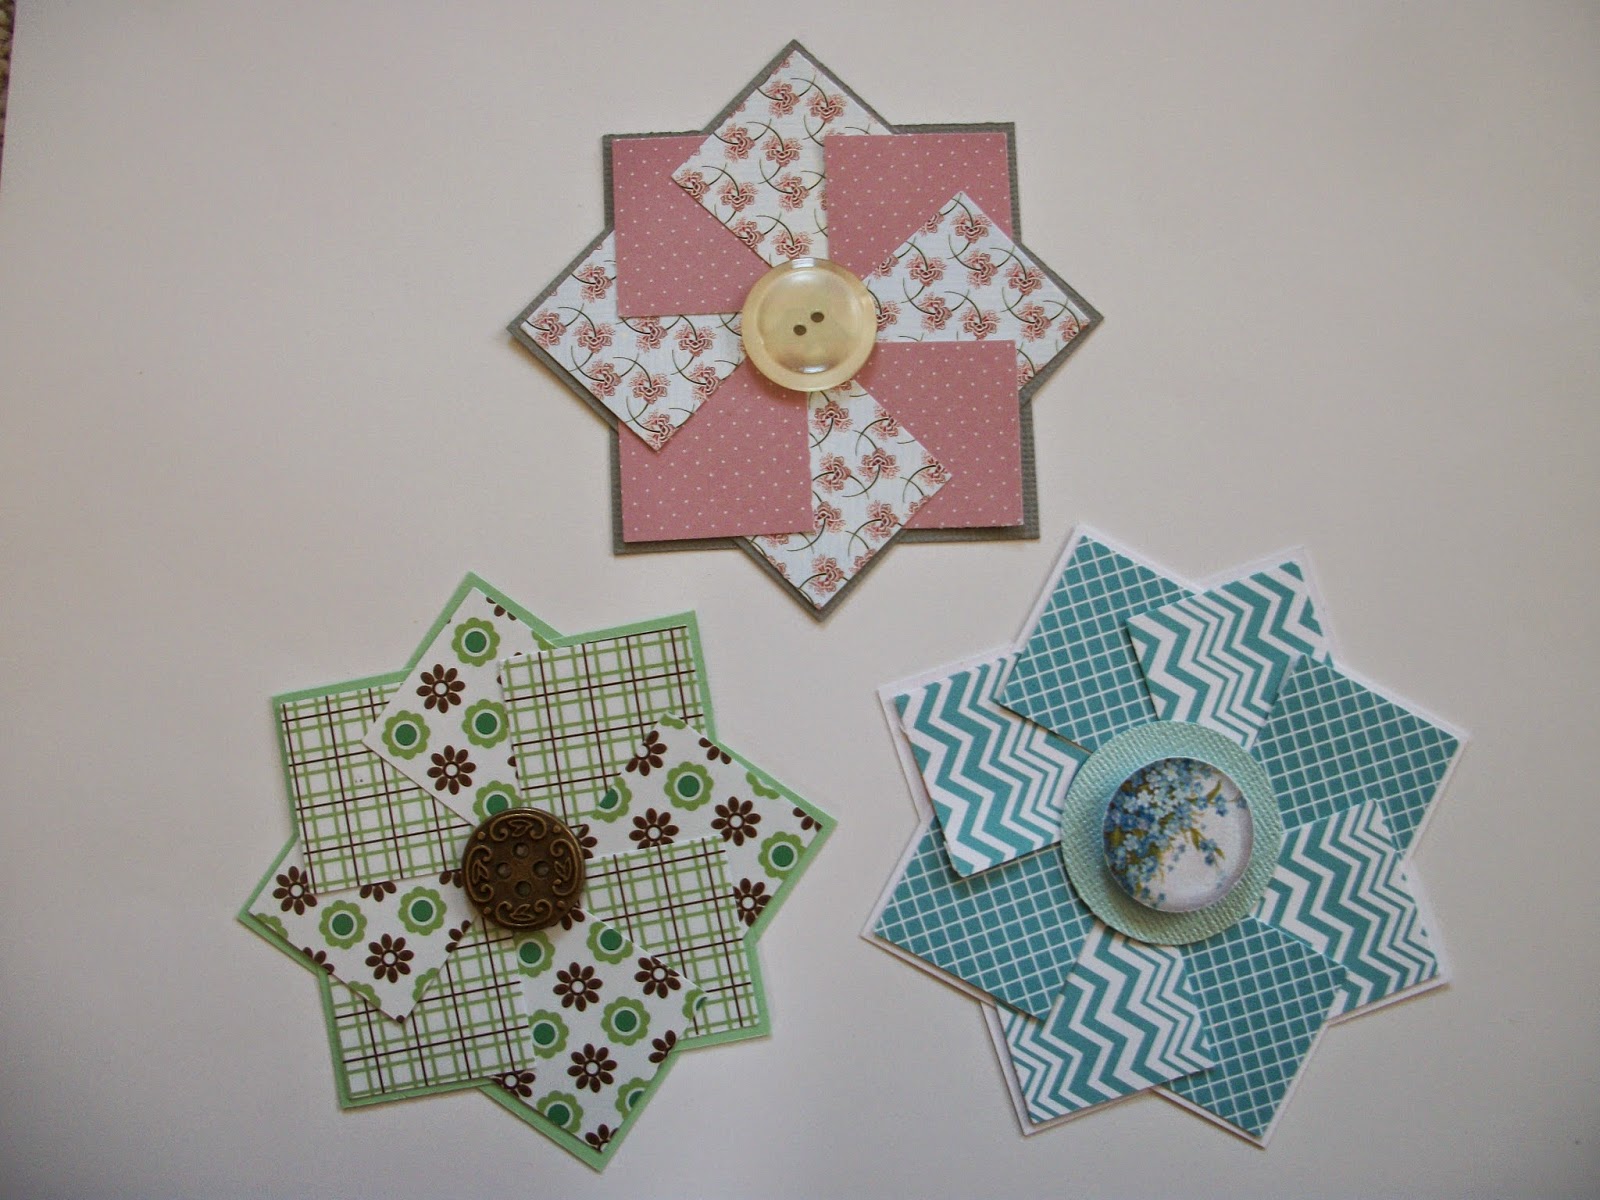
One day I was sitting at my computer doing one of my favorite things ~ a Google search of “how to use paper scraps.”  I found a fun pinwheel pattern tutorial and decided to give it a try.  I loved the results and have used several of these for card fronts.  They are so easy to make and you can use your scraps! 

You need 2 squares of plain-colored card stock measuring 2 5/8” x 2 5/8” to use as the foundation for the pinwheel.  Then you’ll need 8 squares of card stock or paper measuring 1 ¼” x 1 ¼”.  The squares can be hand cut or punched.  It’s best to use two different patterned papers for the smaller squares or you could even use a solid color with a pattern as long as it’s a contrasting color from the foundation.  Make sure to look through your scrap bin for those perfect scrap pieces. 

So here are my supplies for three different pinwheels. 


Take your two squares of card stock and overlap the squares diagonally. 


Apply adhesive to just the corner of one of your punched squares and place as shown.  The corner with glue should be on the outside point. 


Using a contrasting pattern, adhere the next piece of paper.  Continue until only one square remains.  Tuck the final square behind the first square to finish your pinwheel.  


That’s it!  See how easy that is?   Finish off the middle with an embellishment of your choice.  I chose a button for two of them because I have so many right now, but you could use a brad, a sticker, a punched circle ~ whatever you think would complete your pinwheel.  On the blue one, I used two different sized punched circles with a pop dot to give it some dimension. 


Here's a birthday card I made using one of the pinwheels:


 To make things even easier, I keep a stack of 2 5/8” x 2 5/8” squares and the 1 ¼” x 1 ¼” squares in a small container to have on hand and ready to go when I feel like making these.  So far I’ve only used them on cards, but I know they would look awesome on the right scrap booking layout, too. 

Thanks for stopping by.  I hope I’ve inspired you to use those scraps!


   Sandi Chromey
     Creative Team Member of SCRAP YOUR SCRAPS 


Wednesday, 10 September 2014

Scrap those SCRAPS.

Since I had knee surgery and was not allowed to use the steps, I had Ken bring me some thing from my stash. But I was bound and determined that no matter he brought down, I would use up and make some cards...
It did help that I had a 12 x 12 box labels scraps for cards and another one that said embellies. Again, everything was made from scraps I had laying around... no new packages were violated!
There are a few things that I used that I had just purchased, but those packages were already opened and had been used.


These are VERY plain and simple cards. I'm happy with what I accomplished and this didn't even put a dent in those scraps!
 

Again, make your projects your own. Mix it up, turn it around, just make it your own: no right or wrong.


I apologize for the photos, but to be honest, after all these years, I have yet to find a place in my house where I can get great photos!


  June Geraci
  Scrap Your Scraps contributor


Thursday, 4 September 2014

Start Small ~ Add As You Go


Hi Everyone,

Today I want to show you how easy it is to make more of your own embellishments by starting small and creating multiple layers until you get your desired finished project.  Sometimes by starting small, it doesn’t seem quite as overwhelming.  This is also a great way to use some of those scraps in your stash or extra paper pads. 

First, I find some plain or patterned paper.  Then I cut this paper into rectangles.  They can be any size, but I would cut them all the same to begin with.  It makes it easier to make several at a time.  In this tutorial, I cut all of mine into rectangles roughly 2.5” by 2”.  

Next, cut those patterned rectangle pieces on the diagonal.  Don't cut all of your rectangle pieces because you need some of them as a backing for the diagonally cut pieces.   


Now comes the fun part of piecing the different patterned pieces together to make the first layer of your embellishments.  Start matching up some of the diagonal pieces with your rectangles until you get them the way you want.  Adhere the diagonal pieces onto the rectangle. 


Try adding some circles punches, square punches, buttons, word art, or whatever you want as another layer.  Use your imagination.  I'm really loving circles lately.  So I used my two different sized circle punches.  For some of these, I used pop dots to make them more dimensional. 


You can use these just as they are or take them and add it to a 4x6 piece of card stock to use as a card topper, pocket page filler card or on one of your layouts. For these, I added a couple more layers of solid color rectangle card stock.  I then mounted them onto a 4x6 card and added some fish tail accents. 


See how easy that is?  Just start small and continue to build your layers until you get to your desired finished project.  I like to make several small ones just to have on hand.  That way I can use them later to make cards or add to my layouts.  I keep them stored in an old glass candleholder.  

Here's an 8 1/2 x 11 layout I made using a couple of the embellishments:

I hope you’ve enjoyed this tutorial and are inspired to start making some of your own layered embellishments.  Thanks for stopping by!


Sandi Chromey
Creative Team Member of SCRAP YOUR SCRAPS

Tuesday, 19 August 2014

Scraps Only Layout

Hello Everyone

Today I'm sharing a layout I created using only scraps I had from Lawn Fawn 12x12 and 6x6 sheets of paper.  I love making use of every inch of paper I love and seeing how far I can take it.  I have used as my layering pieces as well as using them to cut out my die shapes.  Hope you get inspired to use your favourite papers until there is nothing really left.


Thank you for stopping by and Happy Scrappin'!


  Mandy Reedyk
   Creative Team Member of SCRAP YOUR SCRAPS 


Friday, 25 July 2014

Everybody Loves a Party: Using Party Supplies On a Layout

We celebrated my daughters second birthday in June, and after we were packing up I got to looking at all the crepe paper that we have.  I have a plethora of crepe paper, and it was kind of sad that I only use it for parties, since you get sooooo much on roll!  I decided to use it up here to make a cute backdrop for a party layout!


I gathered some patterned papers along with any crepe paper that matched with my photos for this layout.  I decided to make this a two page layout, since this was for my daughters first birthday and I had done a two page layout for my sons first birthday.  I'm not the biggest fan of two-pagers, I just find them more difficult to get a cohesive look in general, but I was willing to give it a try again!


(Please excuse the messy glass mat, I use it for painting as well!)  I started by laying down a strip of tape and then proceeded to accordion fold the crepe paper along the tape line.


Here is a close-up of the accordion folding.  Nothing fancy going on here, it doesn't need to be perfect!
Ta Da!


And here it is with all five colours.


I used the finished half to line up where to put the tape so that both sides would match up as well as possible.  This really wasn't a very long process, I just sat down and put on a show while I accordion folded to my hearts content.  (P.S don't get crepe paper wet!  Also, don't feed it after midnight ;p )


Here is the final product! Click on the image to see it larger. 


   Cathy Martin
    Creative Team Member of SCRAP YOUR SCRAPS 

Wednesday, 16 July 2014

Use up that Ribbon!

When I decided to do a major purge on my ribbon, it was difficult for me to toss out those small pieces.

So I made up my mind that anything smaller than 12" - 6" would go in a jar, everything else got wrapped around tongue depressors. Those tiny, tiny, tiny pieces of ribbon got tossed.
I happened to be on Pinterest and saw a card that I thought would be perfect for those smaller pieces of ribbon. I tried to make it my own and hope you will do the same.

I did not put a sentiment on my card because I felt that this particular card could be used for just about ANY occasion and would be great to have a bunch of these on hand for that spur of the moment when "I need a card."

My card  is standard 5 1/2" x 4 1/4". I then cut my card base 1/2" smaller on the top and on the side. Which of course will then give you a 1/4" frame when put on your card.

I eye balled the center of my card very lightly drew a circle approximately the size of a quarter. I used that as a guide for placing my ribbon pieces. I found that if I kept crossing my ribbon over each other that my card center was becoming VERY thick, so I decided to cut small pieces and just stagger them around the circumference of the circle I had.

Once I was happy how the ribbon was laid out, I found a button, threaded it and glue dotted that to the center of the ribbon. Once again you can use just about anything to get the same effect: washi tape, ribbon, thin scraps of paper, for your starburst effect.

For the center you can use a button or even a flower.


   June Geraci 
   Creative Team Member of SCRAP YOUR SCRAPS 


When I saw June's post about using up your ribbon, I knew I needed to listen! I hardly ever use ribbon on my layouts and cards.  I'm not sure why, but it just doesn't seem to be my "go to" embellishment.  So I decided to take up June's challenge and use some of my ribbon.

I took a 6x4 card and punched holes on the side.  Then I found some ribbons that matched the colors in the card.  All I did was put the ribbon through the punched holes and tie a knot.  This is what I came up with:


I had some fun pictures of my nieces at our Fourth of July celebration.  So I adhered the 6x4 card onto another sheet of paper and added some word art.


This is the final layout.  It is a 12x12 pocket page with the top pocket being 12x6 and the bottom having three pockets which are 4x6.


 Thank you June for inspiring me to use up my ribbon!


  Sandi Chromey 
   Creative Team Member of SCRAP YOUR SCRAPS 


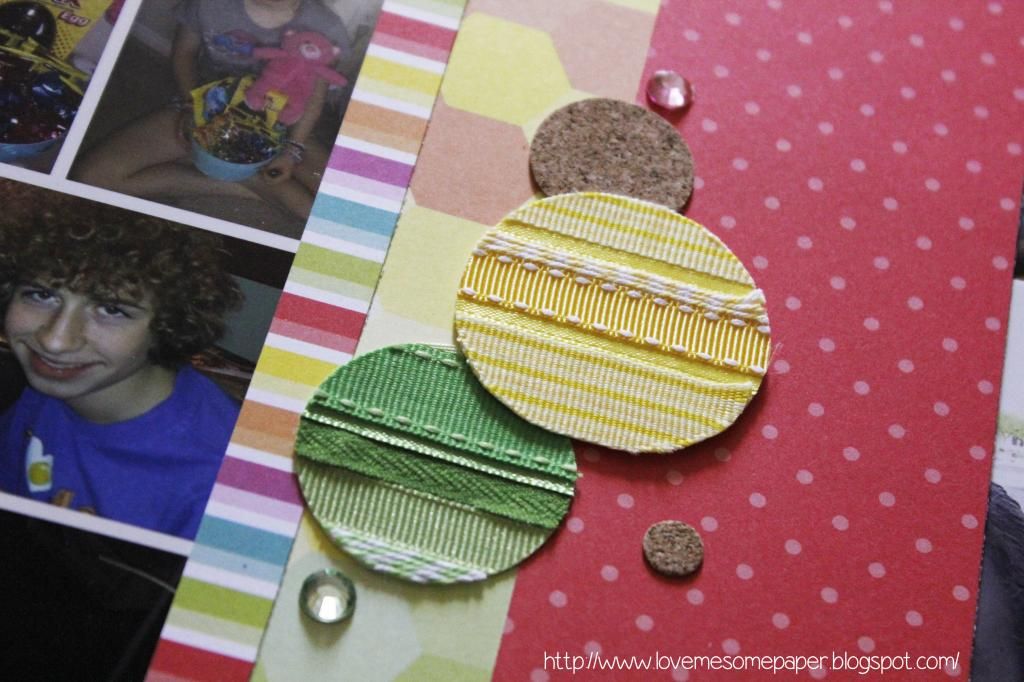
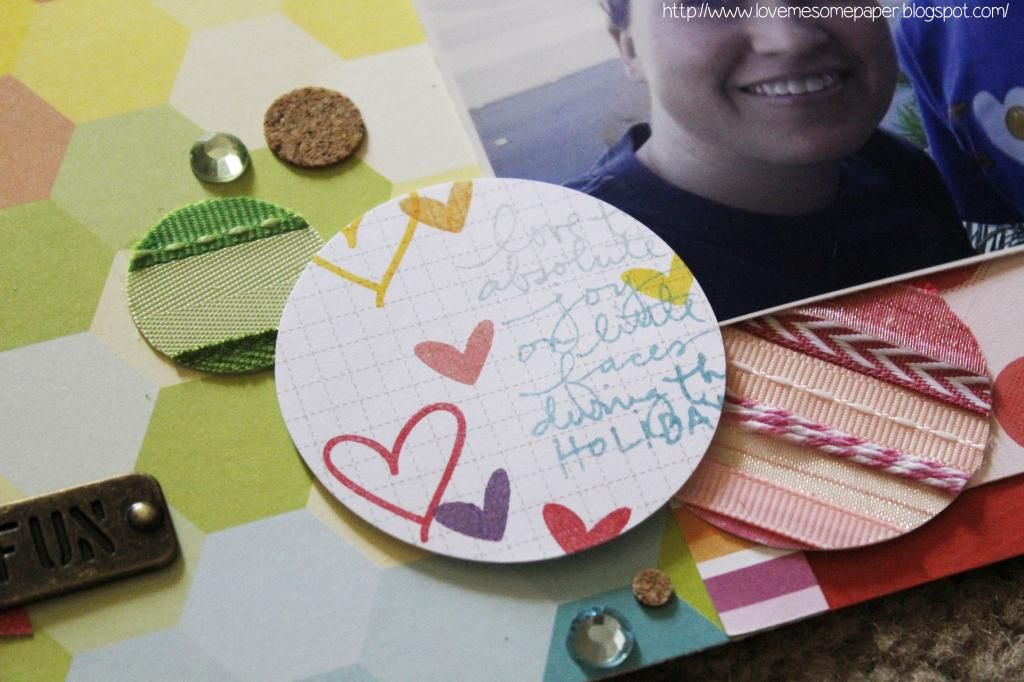
 I chose to grab some different ribbon scraps and make some embellishments for a page I was working on for 3 Scrappy Boys.

 I just put a bunch of strong adhesive on some scrap paper and laid down my ribbon scraps in coordinating colors.
 Then I ran the sheets of paper through my Big Shot manual die cutting machine with a circle steel rule die and it cut like butter!


   Nicole Bingaman 
   Creative Team Member of SCRAP YOUR SCRAPS 
Related Posts Plugin for WordPress, Blogger...