Showing posts with label something old & something new. Show all posts

Friday, 13 February 2015

Old to new. Upcycle Cricut Cartridge Box.

Hi Everyone.  Connie Here. I am currently getting ready for a big purge of my supplies. I am condensing storage and trying to utilize my space better.  I had a bag full of Cricut Cartridges my nephew was using as building blocks and I knew I could come up with a fun way to transform the boxes. Here is what I came up with.

The embellished Box

Close up of Box with Flower Cluster

Inside of Box. I used Washi Tape. Mini Tag Album fits inside.

Box and Mini Album.

I am working on several more of these to give to my Daughter's Teachers.
Thanks for looking and I hope you find creative uses for your old Cricut cartridge boxes.

Sunday, 21 December 2014

Christmas Past


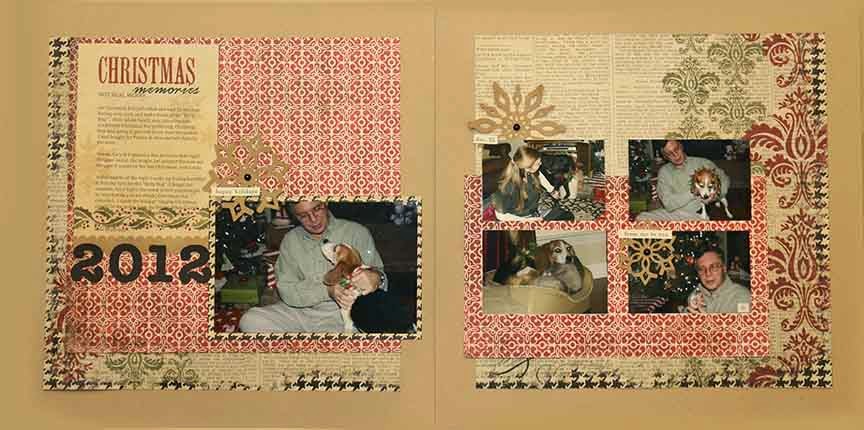
I pulled out Christmas papers, but soon realized I did not have enough coordinating papers for a double page layout.

Do you ever find yourself in such a situation? I frequently do. I usually throw up my arms run to the nearest store and buy more paper. Not this time. It was getting late and I was not in the mood to battle the holiday crowds. Besides this was the year I was going to use what I have on hand. I also wanted to get in the Christmas spirit., NOW.

So this month I challenged myself.

1 double page spread, 2 sheets of patterned paper and 2 sheets of card stock and a few embellishments.


I cut my patterned paper to 10 x 10. Instead of cutting 2 inch strips, I trimmed the patterned paper into an “L” shape giving me a corner piece to work with.


The red pattered paper was “pieced together” and the pattern was matched in several areas. See if you can find them.

I challenge you to do the same. See if you can make a double page layout with only 2 sheets of patterned paper.

And have yourself a Merry Christmas and Happy Holidays!


Thursday, 9 October 2014

Guest Gina Huminski (GinaBeth1) : Melding Old and New

Hi everyone, Tiffany here to introduce a guest blogger today. Her name is Gina Huminski, but you may know her as GinaBeth. She is one of my very favorite people to watch on YouTube, and she never fails to inspire me. I have always loved the way she uses her stash, mixes product, and follows the rule to do what looks right to your own eye. I was so excited when she agreed to do a post for us!
You can find more of her work on her blog and her YouTube channel.

  Tiffany O'Grady
   Creative Team Member of SCRAP YOUR SCRAPS 


I think any time someone approaches you and asks you to share your work with a group of their readers, it can be a very humbling experience and yet also terrifying.  When Tiffany asked if I would like to contribute a blog post to this blog, I was over the moon excited, but at the same time, wondered what I would like to share.  Tiffany gave me total control over the content, but she did mention something to me that stuck.  She said that one of the things she likes most about my scrapbooking is my ability to meld old and new product.  As I thought about this over the last few weeks, I started to wonder why that would be something that someone would notice.  Here are my tips if this is something you struggle with:

1.  Don’t keep up with the Joneses.  We all look at the layouts that are posted in the social groups to which we belong and we all have that one scrapbooker that we wish we could be.  His or her layouts are always inspiring and something that we would like to achieve.  Let me be the first to tell you, that’s okay, but let me also tell you that just doing your own thing is okay, too.  These are your memories that you are preserving.  You don’t need anyone’s approval on how you do it.  The great thing about scrapbooking is that it’s all about you; there are no rules.  So feel free to put whatever you want on your page, try whatever technique caught your eye because at the end of the day, the only person who can turn a critical eye to your work is you.  So if you like it, embrace it and move on to the next page.  It’s only paper!

2.  Don’t keep track of trends.  When we look back on our memories twenty years from now, we’re not going to remember that during the Summer of 2014 every one was into watercoloring or that enamel dots were the hot thing or that gold was everywhere.  We’re going to see pictures; we’re going to read journaling and we’re going to remember those stories.  So if you want to meld your old product with your new, remember, that trends come and trends go and sure enough, they also come back.  Has every one noticed the reprisal of tear bears?  I rest my case.  It really goes back to what I stated in point #1.  Do what makes you happy.

3.  Put your supplies away.  One of the reasons why I don’t realize that I’m mixing old and new products is that I don’t keep track of what is old and what is new.  I order new stuff and I put it away so that when I’m in the middle of a page and I think to myself, ‘oh, I need one of X’, I know where it’s located.  Whether I pick something that I bought last week or something that I bought three years ago doesn't matter.  If it fits on the page, I use it.

So that’s my three thoughts on melding our old and new product.  Let me share with you now the layout that I made for this blog post.
When I began to think about this concept of using old and new, I started to look around my room at all of the supplies that I have amassed over the years.  I decided right away that I would do a monochromatic layout.  It’s much easier to pull supplies that way.  This was a departure from my normal process.  Typically, I start with the pictures, but this project was more about the supplies, so I started there.  I decided that I don’t scrapbook with the color purple very much, so I would try to do a monochromatic layout in purple.  I pulled all of the supplies I thought I might want to use.  Again, since all of my supplies are put away regardless of their age, I didn’t know that I pulled a set of brads from 2005 and a set from 2014.  I didn’t end up using any of brads – but this is what my supply set looked like to start.


Next it was time to find some pictures that might go with this purple theme.  I have a large stack of photos from the beginning of 2014 already printed.  I searched through those and found this photos of our night attending Cirque Ziva.  The pictures had purple in them.  I was on my way.


Then, I began to think about new.  I had a lot of supplies next to me, but in looking at the rhinestone and glitter flowers, the brads, the eyelets, and all the rest, none of it screamed new.  So if my supplies aren’t new, then I would embrace a technique that is very popular right now.
Using a Heidi Swapp stencil, some Pearl Mica Flake medium from Ranger, and a sheet of Glitz pattern paper from 2009, I created my background.


Following that, it was time to figure out where the pictures were going to go, find a place for my title, determine what my journaling was going to say and where, and then embellish.
Using the older supplies and the newer technique, this is the final product.  I absolutely love it. 


The title is made from old Heidi Swapp Alphabets called Schizophrenic in Lilac.  They were released in 2005.  I didn’t like the light color of them so I colored over them with my Wink of Stella brush pen in violet.  The rhinestone and glitter flowers are just from my stash as is the large flower.  That flower came in a kit many years ago.  I added some puffy hearts that are more recent from Freckled Fawn along with some metal hearts from this year.  They are by My Mind’s Eye, Necessities collection in metallic.  The doily I purchased from a shop on Etsy.  As the finishing touch, I took a page out of Nancy’s (kittyscrapper) playbook and used phrase stamps from Amy Tangerine, Dear Lizzy and October Afternoon to finish off the layout.  The journaling was done using a Staedtler Triplus Finepoint marker.

I hope that through sharing this, you have been even a little bit inspired to get to your workspace and start capturing your memories.

Take care and thanks again ladies for inviting me to contribute.  Gina


Saturday, 16 August 2014

Create, Don't Just Collect : 50 Projects Challenge

Hi there!
Tiffany here, with an idea that I hope encourages you to get creative!
Last spring, I was talking with some online crafty friends about all the pretty things we had ordered, and how much money we had spent. I went to add up my purchases, and let me tell you, you want to think carefully before you do that. Once I regained consciousness, I realized that I was buying way more than I was using. Sound familiar? Around that same time, one of my favorite YouTubers, GinaBeth1, mentioned that she had so many new supplies, she could make 100 layouts without buying a single thing.

I started thinking about my tendency to shop, and the 50 Projects Challenge was born.

The initial challenge was to create 50 projects without buying anything but necessities. Some participants kept a single kit club subscription, or gave themselves a 'pass' for special occasions. I counted greeting cards, pocket page spreads, 12x12 layouts and even major organizing as projects. It wasn't easy but in the end I felt really good about actually making things, and not just collecting pretty supplies that never made it to a page. I didn't make the dent in my stash I was expecting though!

I learned a few valuable lessons in that first round of 50. The biggest one was that when I didn't have time to sit down and make a whole page, I was more likely to shop. It's easy to whip out my phone and browse through the latest goodies. It doesn't make a mess, it doesn't take much thought, it's fast and it scratches that creative itch. The problem is that it does scratch that itch, and then I'm not as eager to get into my craftroom, and the cycle begins. I also learned that I'm tempted by sales and will buy things that aren't a great fit for my style or needs if I feel like they are a great deal, and if someone I'm inspired by uses something I sometimes feel like I 'need' it even if I'm not sure how I personally would use it.

Now the challenge has a home on Facebook, and though a lot of members stick with the initial idea of 50 projects, some do a monthly goal or choose a more manageable number. The real goal is to encourage each other to pull those pretty papers off the shelf and USE them. To harness that creative energy to actually create, instead of just collecting supplies, however beautiful they may be.

Sometimes I think it takes a challenge, or an encouraging group of like-minded crafters to get us going. It can be hard for me when a lot of my online crafting buddies are enabling and I'm trying to watch my pennies, or even just make time to use the last collection I purchased before buying more.

If that sounds like you, you're welcome to join us! We now have over 1,000 members on our Facebook group, with thousands of projects shared and zero temptation brought about by shared deals and hauls.

And if 50 Projects doesn't sound like a challenge or community that would work for you, I encourage you to find something that is a better fit. But consider a challenge that includes some accountability and encouragement to help kickstart a season of great productivity! I'd love to hear your thoughts on how challenges have helped you dig into your stash and create, instead of just collecting.

  Tiffany O'Grady
   Creative Team Member of SCRAP YOUR SCRAPS 


I have been a member of the 50 Projects group since October 2013.  Since then I have completed 6 rounds of 50 projects!  I cannot tell you how much this group has inspired, encouraged, and motivated me.  It's the best thing that's happened to my scrap booking hobby in years.  I had been in a little slump the past few years.  I would look at Pinterest and get ideas, but never followed through on any of them.  I had all the supplies and really liked buying them; but the motivation just wasn't there.  I had joined another group on Facebook which happened to mention the 50 Projects group.  I asked to join and started following the many posts of people's finished projects.  That's when the change began!  I started to get motivated.  I started to see projects that looked like fun.  I started to get inspired and really wanted to create.  When I started posting my finished projects, people actually liked them and commented on them!  I really felt like I was part of a community and that I belonged somewhere.  I retired two years ago and had worked from home for years before that.  So this Facebook group became somewhat of my connection with the outside world.  Not only did I feel a connection, I was starting to use my scraps, papers, punches, and all the embellishments I had been storing!  I started to get organized.  I created a beautiful space for my scrap booking.  I could go on and on, but I don't have time.  I have to get back to my scrap booking!


Sandi Chromey
Creative Team Member of SCRAP YOUR SCRAPS


50 Projects - On May 17, 2013 I joined and posted my first project. To date I have completed 5 rounds of 50 projects and have almost completed round 6 as well. When I joined 50 projects I had been on a buying binge for a long time and not really creating as much as I wanted to. 50 projects got me away from loading my " shopping carts" from multiple online stores and back into my craft room to create. All the members are great in that everyone encourages each other and likes and comments on each other's projects which I think goes a long way to get us motivated to keep on creating. It is a great community of kind and talented people. I get motivated by seeing what everyone creates from cards to layouts to organizing all our precious paper crafting tools and supplies. Tiffany is brilliant in seeing a need that I think a lot of us paper crafters can relate to in that we sometimes ( ok... For me it's all the time! Lol) get carried away and buy all the beautiful products out there and then have them pretty in our rooms/ spaces but don't actually create.  This group is a great place to start creating and maybe not buy so much or at all until you start actually using up some of your great purchases that you had to have!  This group was also the jumping off point for me to start meeting a lot of great and talented people and be part of some great design teams where I have been able to expand my creativity. Thank you so much Tiffany for all you have done for me personally as well as a lot of other paper crafters who are now creating instead of just buying!


  Mandy Reedyk
  Creative Team Member of SCRAP YOUR SCRAPS 

Tuesday, 22 July 2014

Fall In Love With Your Old Stash Items Again

Do you have items in your stash that you feel like you have fallen out of love of?
At one stage, you purchased because you liked something about it, but now you have forgotten what ever that was. And now you are stuck with these products that you don't know what to do with them, but don't want to feel like you have wasted your money, either.

Well, my name is Carlie Hamilton, and I am determined to use my stash, even those items I no longer love!

In this post I am going to share a few ideas I have to help you to fall in love with your old stash items again.


Alter It To Make It Feel New

With this technique, get your old embellishments and change it so that it feels new again. Cover it with washi tape, or paint it to change it's colour. This is great with things such as chipboard and more. By changing the product's colour, you can turn an obviously outdated product to something that is more in line with your style today.

Another technique that you can do with paper is to gesso over it. Gesso is a primer used in painting to create a surface that is easy to work with. If you don't have gesso (and maybe you don't want to buy it just yet) you could get a similar look with white acrylic paint. Use a paintbrush to create a light layer of paint over your paper, which will dull down the colours and the pattern, giving you a great new surface to work with. If you really hate that old paper, you can make the layer not-so-light!


Consider colours

When I am looking at older papers, often they have motifs on them that I am no longer interested in. But, if you are like me, often you don't want to just throw these pieces of paper away.

One thing you can do is to use this paper to build up layers on your pages. Consider the colours on your paper and look past the motifs. I use these pieces of paper to create matts for my photos or elements on the page. Sometimes I really hate the paper, so I have just a sliver showing. But you know what, it adds a nice bit of depth to my pages, and it is so satisfying using up that old stuff!


Just Use It

Speaking of feeling satisfied, there is nothing like that feeling of accomplishment when you use an old embellishment that you are not exactly in love with any more.

For me, I am not that into eyelets anymore. They are just a bit of a pain in the bum, and I would rather just use an enamel dot, or even a brad. To use an eyelet I have to get out my tools to make holes and set the eyelet... ugh. It makes me annoyed just thinking about the process.

But I do have eyelets left in my stash. I like to mix old products with new things on my pages to keep my stash fresh, so every so often I'll make an effort to use my eyelets. And when I see my old products that just work with my new products, it suddenly looks and feels fresh and new again.

So get out your older stuff that you are maybe not so in love with anymore, and match it up with your new stuff. Placing it on a page, at the very least you will get some satisfaction using up your old stash. But at the most, you will actually find a new love or discover what it was that made you fall in love with the product in the first place.

So get it out and use it!


Carlie Hamilton
Creative Team Member of SCRAP YOUR SCRAPS


Hello everybody, Solange-Isbaha here! I wanted to share a brilliant idea by Janet-CherryPicker, because I thought that it fit perfectly the topic: you can use this idea with scraps, or with papers considering only the color, like Carlie suggested... But of course, you can also use papers you love, like Janet-CherryPicker did!
So here is Janet-CherryPicker's project: thanks for sharing your ideas with us, Janet!

As any good scrapper, I wanna take supplies with me when we travel.
For car trips I used to take along plenty of print magazines, so after they started to
wean I had to come up with something else. I love being able to do something
'scrap-related' for those long car drives. The past few months I have been
using this kit. Super simple, super compant and super fun.

Before leaving, I use these punches and my scraps. I also use a circle punch too.


I punch out many pieces til I get a nice assortment.


Add in my Tombow glue and place it all in a Iris container. It measures about 10.5 "x 10.5".
This is what it looks like when I am using it. Just open and start creating.
It fits perfectly on my lap. No space needed.


While in transit from place to place, I do keep items bagged separately,
After the first trip, I soon realized I don't want to organize this bin every time I open it...lol


And here is what I make. Lots and lots of embellishments.
I have plans for these to go onto notecards for gift sets. But you could use them
for gift bags, tags, layouts, bookmarkers, just about anything.


Some close-ups. I just mix and match whatever is in my bin,
GREAT way to use scraps. I make 2 different sizes of scallop styles. 


And that is my current 'On the Road' Scrap Kit.
The only thing I bought was the Iris container- Hobby Lobby- the rest is just
'stash' items. Gotta love that.


 Janet-CherryPicker
 Guest contributor for SCRAP YOUR SCRAPS

Saturday, 28 June 2014

Layouts - Mixing Old with New

Hi everyone!  I'm so excited to share with you today my thoughts about mixing older products with newer when creating your layouts.

If you are like me at all, you have quite a stash of products.  I have, in the past, been guilty of hoarding my newest products for just the right project.  The problem with that, of course, is that the "right project" just never comes along.  In the past couple of years, I've gotten over the fear of using up my newer products.  That's what they are there for, right???  So, that leaves me (and probably you too!) with the dilemma of what to do with those products you've had for 2, 3, maybe even 5 years or more.

So, one thing I've done is challenged myself to use at least one older product on my more recent layouts.  For this layout, most of my products were at least two years old, but I wanted to make sure to incorporate products I've acquired in the past 6 months or so.

I had this precious picture of my niece working on one of her water color masterpieces and had not yet gotten around to scrapbooking it.  I used to colors in the photo to choose a variety of background papers and embellishments.


I chose several older, but brightly colored papers from Bella Boulevard and one much more recent chalkboard style paper from Crate Paper to offset the vibrancy of the other patterns, knowing that I would be doing some layering.  Some new clip embellishments, a chipboard frame, and die cut picture from Crate Paper, along with some more recent envelops from Studio Calico and an older flare pin and more colorful offerings from Bella Boulevard rounded out my product.  I also just received a big bag of cute buttons that I wanted to include somehow.

I knew when I started, I probably wouldn't be using all of these items on my actual layout, but if you want to try this process, I suggest pulling out more than you are going to use just so that you give yourself some options!

Here is the finished product with a mix of older papers and embellishments with a splash of some new!  The letter stickers are also a few years older.


Thanks for reading and I hope you have been inspired to create using older items from your stash!

  Deedee Horton
  Creative Team Member of SCRAP YOUR SCRAPS


Monday, 16 June 2014

Revisiting Older Products in Your Stash

Hi - Nicole here waving to everyone!!!  This is my very first post for the Scrap Your Scraps blog and I'm super excited to be here with all this amazing talent going on!

Today I would like to talk about something very near and dear to my heart - older products in our stash.  I know, it's not a trendy thing to discuss.  Most of us all see the new releases throughout the scrappy seasons and our hearts go pitter patter and our wallets cry out for mercy (or at least MINE does with Simple Stories...but that's a whole other blog post... lol ).

I'm sure many of us can remember trips to our local scrapbook stores or big box stores and finding ourselves oohing and aahing over the beautifully displayed NEW products.  Grabbing two sheets of every paper in a line, and of course every. single. embellishment.   Fast forward a few years - and those products are still waiting for the "perfect" page or project to magically happen.  I don't know about anyone else, but I have recently found myself embracing the freedom of older products.

I would challenge anyone reading this to take a trip down memory lane in your stash and revisit items or collections that you have been holding on to for some time and look at them with fresh eyes and ideas.  Let go of the idea of the "perfect page/product" and use them NOW.  (As long as you still love these products of course, I recently sold a lot of stash that I was no longer excited about).

I'm going to share a few pages that I have done in the last few months with older products; things that have been out for awhile and are not the latest lines available.

For this double page (sketch from Scrapbook Generation), I used an older collection pack by Echo Park - and I'm not sure how old, but I bought it at a convention and those never have recent releases - at least the ones that come through my town...

I also paired the papers and stickers up with tons of older stickers and some ribbon from my stash.


For this single page (sketch #318 from Nuts about Sketches), I used older Bella Blvd halloween collections and stickers - these came in a warehouse box from 2013 so I know a few of the papers are pretty old!


Here is the process video for this layout:


Since I already had all the Bella Blvd halloween stuff out, I grabbed some of the Witch Hazel collection by October Afternoon (also from a warehouse box/santa sack = OLD!) and created a double page (sketch #319 from Nuts about Sketches).  


For this one - I did use newer papers that came in my monthly kit from 3 Scrappy boys, but I paired it with a LOT of older embellishments from my stash.  I love mixing new and old together.  It's a nice surprise to find older things in my stash that I still love, am inspired by AND they work well with newer items.


So go and check out your stash and try to find some older products that you may have forgotten about or have been saving for something "special" that just didn't happen - and make SOMETHING, ANYTHING, just use those older supplies and enjoy the process!


  Nicole Bingaman
   Creative Team Member of SCRAP YOUR SCRAPS


I loved that Nicole went back and revisited some of her old supplies and I decided that I needed to do the same.  A little backstory,  I have only done one major online order since starting scrapbooking, and that was in 2010.  I don't really have the money or access to buy new products all the time :(  but I do work at a store that sells scrap supplies, so that is where I pretty much get all my supplies from, although they're not new releases or anything, so I guess what I'm trying to say is I have A LOT of old supplies, that I just never use. 
 

 For this layout I went back to an older collection from Cosmo Cricket called Nutmeg.  I loved it when I bought it forever ago but never found the right layout for it.  I used it for the small scraps behind the pictures, and used some stickers from the same collection, and I used the Basic Grey Konnichiwa line for the background paper.  The bows and owl embellishment are new, and the leaves are old. . . VERY old. I am loving this layout and can't wait to break out more of my older stash and get scrapping.  Thanks so much for the inspiration Nicole.


   Cathy Martin
  Creative Team Member of SCRAP YOUR SCRAPS


Related Posts Plugin for WordPress, Blogger...